Tuesday, 22 March 2016

Day 7 - Drilling out attempt


So after doing some cleaning on the engine in the house I've concluded the house isn't the best place for working on an engine especially if you intend your house to be in a decent living condition without constantly cleaning up grease and oil. So I've moved the engine back to the garage and after purchasing an extractor set, I give it a try on the snapped bolt on the cylinder head. However I've also ordered a replacement cylinder head from eBay which is on the way so this is more of an experiment really, but if it fails at least I have a replacement coming.


I start off by drilling a 1mm hole, then a 2mm hole, then 3 until the extractor goes in nicely.


Unfortunately I found that the 3mm extractor has no real way to get any torque on it. Maybe I need a seriously small 3mm ratchet (if one exists) so I unded up trying pliers to squeeze as tightly as possible on there but even using some heat from a butane / propane Blow torch I've concluded thats a lost cause and I'm going to wait for the new cylinder head and fit that after cleaning it up.

I still need replacement pair valve pipes that connect to these holes and go out to the pair valve.

Friday, 18 March 2016

Day 6 - Cleaning & Starter Motor


So now I have the engine indoors, the first thing I decide to remove is the starter motor. Very easy to come out with the engine so accessible. I take the starter motor apart and notice a whole load of black dust come out which I imagine is the wear of the brushes over time. All the starter motor parts laid out...

Gave that a good clean and followed the service manual about where and where there should not be continuity, and ensuring the brushes don't need replacing. The service limit on this is 4.5mm and these ones were about 11-12mm - so tons of life left in them.


But the day wouldn't be complete without finding another problem. The exhaust stud at the top of the picture is the problem. It's not screwed in fully and all attempts to get it screwed further into the cylinder head was pretty much made impossible by the fact that the stud has siezed up inside the cylinder head. I need to get this stud properly screwed in like the others as that will also contribute to the exhaust header mounting plate not tightened down enough and be a potential for exhaust leakage.


So now to source come more tools, wire brushes for scrubbing down the engine, and a blow torch to apply some heat to those studs and see if I can work them free. Although the exhaust ports are looking better and slightly cleaner than before - just need to clean up the rest of the exhaust ports and then onto cleaning the rest of the engine.

Thursday, 17 March 2016

Day 5 - Engine Removal


First things first, lets remove the Carbs and drain as much fuel from those things as possible. The carbs were a bit of a struggle to remove mainly trying to get those 4 rubbery connectors off the inlet ports. Disconnect the choke and throttle cables and set that aside for another day - I'll spent a separate amount of time on the carbs themselves and clean them up properly and give them a proper service according to the service manual.


I must admit I was slightly nervous about doing this as this is the largest engine I've removed from a bike thus far. The manual says to just support the bottom of the engine with a trolly jack, but parts of me were thinking is that going to be quite enough? So anyway I go ahead and remove the engine mounting bolts, remove the cables and yet more problems I'm finding. The stator cables have been selotaped together! That has to be sorted.


Finally got it out! It wasn't that difficult overall and when lowering the trolley jack just got to make sure you support the engine with your hand so it doesn't topple over. I can just about lift the engine too but I wouldn't want to stand up with it - interesting to know how heavy it is.


Looks like a serious bare shell now. One thing I did do was number the spark plug coils as it looks like the coil on the left side goes to spark 1 and 4, and the right side goes to 2 and 3 - must remember that. At a later time I will clean up the frame and address the rust on the parts of the frame and repaint.


Couldn't resist but had to take the engine inside the house. I had an old piece of worktop board so got some wheels from Homebase and screwed them onto the bottom - makes it much easier to lug the engine around.


It also turns out the engine weighs 64.2 KG. Who knew - for some reason I thought it would be heavier but maybe not. Although thats without any coolant, and no carbs - although the engine oil is still in there. So the plan is now is to clean the engine as much as possible and get it looking nice from the outside before I start taking it apart and overhauling it from the inside. 

Day 4 - Prepare for Engine Removal


So now I've come to terms with the fact that the engine really has to come out (and probably a good thing) I've decided I'm going all the way with this thing. Let's remove the engine, and completely strip it down and give it a full refurbishment and follow the service manual to the letter and check every part for wear and replace anything that needs replacing. So next steps, Remove Side panels, Remove Fuel Tank, remove Air Box (ooo it has a K&N filter installed - gotta clean that and re-oil it). Battery Removed, and now ready to remove the Carbs.


I'm probably going to have to drain all of the coolant too in order to remove the radiator, so we'll do that tomorrow. 

Day 3 - Exhaust Ports


I've been reading a lot about rust removal. I remember the last time I wanted to remove a whole load of rust from that old 125 I built a makeshift grinding box with 2 holes to insert your glove covered hands and used a dremel to grind away at a rusted part until it was shiny and clean again. The thing is I really didn't enjoy that and it was a huge pain and created tons of mess. So this time let's try a cleaner chemical method. So what better than...Apple Cider Vinegar! Apparently it makes a good derusting agent, although it's not the fastest and I'd imagine those headers are going to have to be submerged in there for quite some time before I see some decent results.


Although now in my attempt to clean those exhaust ports and the struggle to get decent clearance to sand it down properly, I discover another problem....


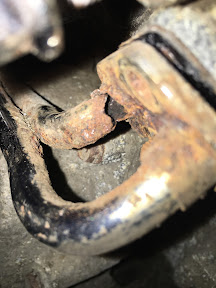
So these little (once chrome) tubes are coming out of the exhaust side of the engine and down to the pair valve. Notice that nasty rusted hole - that was most likely contributing to the nasty running sounding engine. So a new one of those is in order, but unfortunately I ended up snapping the top bolt off trying to get this out. So I give up for today and leave it for tomorrow. Whenever an unexpected problem occurs, I tend to give it a rest until another time - so now it looks like the engine has to come out after all. Sigh....

Day 2 - Lets Begin

The first problem I wanted to solve was the exhaust header leak (or what sounded like it) so time to remove the headers. Getting them off was pretty easy and I was pretty surprised that I didn't snap any header bolts. Although there is some nasty rust on those headers. 


Those exhaust ports could certainly do with a clean up, and really the whole engine block needs scrubbing down.


So I think this was the culprit. That first exhaust gasket looks like it's not going to be doing it's job so it's likely that was not creating a decent seal and leaking exhaust. Next task is to order some replacement exhaust gaskets and clean up those exhaust ports ready for the new gaskets to create a nice good seal.


Day 1 - Collection


So I've had the recent urge to start another restoration / cleanup project, and found this 1999 Hornet on eBay, and after some bidding wars - won it! I had a Hornet 2007 a while ago and missed it, and thought what better than to take an old hornet and restore it back to former glory. I have previously restore an old 125 Suzuki Maurauder but this time wanted to work on a bigger bike. This is the first time I had bought a bike without first seeing it, so really no idea what to expect as to it's condition. The bike was over 120 miles away, so time to hire a van and go and pick up this thing...


Yeah so that's an old projector screen I'm now using as a bike ramp - supported with axle stands to stop it bending.


At first glance the bike looks pretty good! However it's only on closer inspection I start to see the many issues with it. Firstly, it does start but makes a nasty sound - my first though was that the cam chain was loose and slapping into the casing or something else, but there was also another noise that sounded like it was coming from the exhaust headers, like the headers had a leak - so yup they've got to come off. I initially didn't want to have to take out the engine, and my plan was to work on small pieces of the bike at a time - then put it back, work on another piece then put it back - then at least that way the bike was always whole at any point other than the part I was working on.


It's had some upgrades - most notably an Ohlins rear shock which has me quite excited! The shock probably needs a service, but there are lots of forums out there talking about how the Hornets standard suspection is pretty rubbish, and I certainly remember that from having my 2007 model. Renthal handle bars have also been installed as well as a carbon look rear hugger. However the brake light doesn't work, clutch cable seems partially seized, and there's quite a few spots of rust forming around different places.