Wednesday, 6 July 2016

Before and After


Before

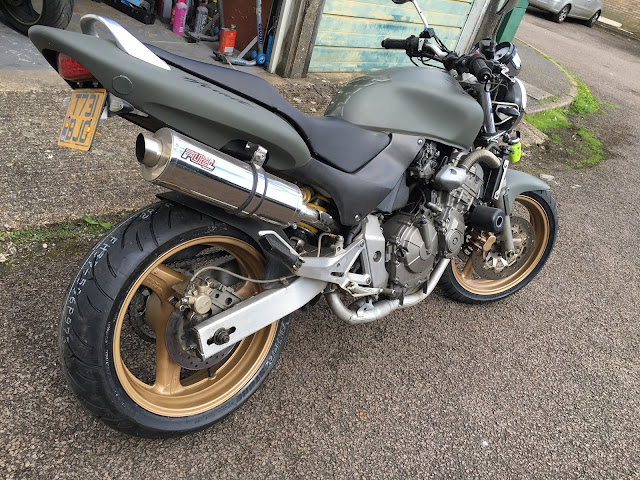
Time for a before and after picture. This is what the bike looked like on the day I picked it up. Doesn't look too bad overall.


After

The wheels definitely make the bike stand out. The gold complements the matt green really well.


So for the full list of work done:


  • Engine Replacement (Engine mileage 8000 ish from install)
  • Exhaust Upgrade
  • New LED rear tail light (From a Kawasaki Versys)
  • New smaller number plate fitted (Including GB mark)
  • New Indicators all round
  • Rear hugger repainted matt black
  • Ohlins Shock spring reconditioned and repainted
  • Exhaust headers repainted silver
  • Thermostat Housing repainted
  • Tank, Rear cowling, and Front mudguard repainted army green
  • Rear wheels repainted Ford Olympic Gold (Metallic) and laquered
  • New wheel bearings all round
  • New Tyres (Bridgestone BT023R)
  • 8000K HID Headlight Bulb Upgrade
  • Oxford Heated Grips
  • Carbs fully cleaned and reconditioned
  • New Air Filter & Spark Plugs (Iridium)
  • New Clutch Cable
  • New Throttle Cables (push and pull)
  • Reconditioned Front brake master cylinder - new seals and push rod
  • Brake fluid replacement Front and Rear
  • New speedometer cable
  • Handlebar risers installed
  • New bar ends installed
  • Handlebars filled with weighted sand to reduce vibration
  • Seat installed with rubber dampeners to further reduce vibration
  • Replaced Ignition coil low voltage cable
  • New front brake light switch
  • Radiator repainted and reconditioned, fan housing repainted and reconditioned
  • Fan fuse replaced


Tuesday, 5 July 2016

Gold wheels

Now I'm back to doing cosmetics again. I did a photoshop mockup of the bike with gold wheels and I think army green goes really well with gold so I get more rattle cans from Halfords and start preparing my wheels for a colour change. This time the primer I use is an Etch Primer which apparently sticks much better to problem surfaces like aluminium.


The colour I've used is a Ford Olympic gold. It was the one that closely resembled what I wanted and so I've put a couple of coats of the normal metallic paint, waited 24 hours and then a few coats of laquer.


As I'm respraying the wheels I figured it's time to get new tyres too. I've gone for the Bridgestone BT023R tyres. However they are quite a tough tyre to get on - way tougher than the Michelin Pilot 3's - but got them on eventually...


The front is done. I decided that if I'm totally overhauling my wheels I might aswell replace all the wheel bearings all round too. So new wheel bearings, nicely coloured wheels and new tyres...


Just got to swap out my rear tyre for the one I painted now. A much better look with the gold wheels - although that's my opinion :P


I've also decided I'm going to coat the tank in petrol resistant laquer as I've noticed the matt finish stains really easily so it's time to add a protective coat to the tank too.


Inspecting the engine damage

So now time to get curious and see what damage I've done to this engine. I start by first removing the cylinder head which was pretty easy. I wanted to get a look at the top of the pistons and valves and see what damage has been done. After I removed the cams, you can instantly see something is not quite right as that valve bucket was stuck in the up position.


Remove the valve shim bucket, and you can see the cotter pins which secure the valve spring onto the top of the valve has been destroyed, so the piston must have been hitting that valve lots of times during those few seconds of engine destruction...


More cotter pins destroyed. I'll keep the valve shims though as they are useful for doing valve clearances on my new engine later on...


So I noticed all the valves don't move at all - all of them are really hard to push down and I work to try and get one of them free and this is the result. The valve stems are really badly bent. Surprisingly though the pistons don't appear to be damaged - it seemed it was the valves that took the brunt of the impact.


Tail light upgrade

Once I installed the new engine, I decide to upgrade that rear tail light. I wasn't too happy with that old style bulb tail light. The one I found actually comes from a Kawasaki Versys and I really like the look and brightness of the led tail light on the road - really noticeable. Thankfully I was able to fashion some metal brackets so I could mount it in the existing holes on the bike and the rear cowling fits over it nicely. Almost looks stock!


Indicator also get replaced. I didn't like those rear side repeater things. Just have to sort out those massive holes in the cowling.


I was able to move the number plate up about an inch higher so exposing more of the back wheel which is always a bonus!


Time for a nice new engine


So even though the end came for the last engine, I went to go and pick up this new engine, and before doing that I strip down the bike and remove the old engine in preparation for getting a new one installed. I was surprised I managed to strip the bike and remove the engine in a single evening. Only took a couple of hours!


Old engine removed. At a later time I will strip it down completely and get a good look at all the damaged parts.


Nice new engine is here! Looks to be a lot cleaner than my old one and also the engine casings are in fantastic condition. Can't wait to get this installed and start it up!


Just to make a quick note of the mileage when the engine was reinstalled. This engine has 8000 miles on it and thankfully the guy had all the service history from the bike it came from.


Time for a colour change


This post should have been published before 'The End' post as I actually resprayed the bike before the engine went bang.

So I decide to get rid of the yellow colour. Whilst I like yellow, I'm not a huge fan of it generally on cars / bikes and I've always wanted an army green motorbike so let's go for it.

First things first I do a bit of fine sanding on the tank and then primer it up using some rust resistance primer.


The rear cowling comes off, and I hang it from the garage door and do the same. The spray paint I'm using is just the standard stuff that comes from Halfords. Let's see how long this lasts...


Now for the front mudguard. I always find if I don't put enough coats, when the paint is dry and I go to reinstall the part back on the bike and it rubs against something like the forks then the paint will scratch off easily.


Army green bike...


I then order some replacement black Honda logos from eBay and stick those on...


Looking good, now just a few more cosmetics to be sorted before I'm totally happy with it.

Tuesday, 14 June 2016

The end arrived


So it finally happened. Coming home riding down the M1 around 70, went for an overtake and increasing speed and the engine went bang. This was followed by what sounded like shattered wine glasses rattling around inside the engine.

Instantly I knew what had happened, as I was kinda expecting it although I didn't expect it to happen so soon, just 450 miles into this rebuilt engines life.

So clutch in and free wheeled to the hard shoulder, thankfully I was able to do that safely and get onto the hard shoulder without too much fuss from other traffic around me. Then it was time to wait for the AA - made it very clear to them that I'll need a recovery home so don't be trying to fix it on the road as this engine has had it.


So I get home, and I'm instantly curious to see what's happened so I pull the cam chain cover, and as I suspected, I've spun a bearing. Although what was surprising was that the main bearing closest to the cam chain had actually come loose and had come out of it's housing and made it's way onto the cam chain sprocket and then got chewed up by the cam chain as shown in the below pic. That was the sound I must have been hearing that sounded like shattered glass.


I turn the engine over a couple of times and you can now see it from a different angle. The bearing has almost moulded itself onto the cam chain sprocket. Tried to get it off with a screwdriver but that thing is well and truly stuck on there.


Now I'm very curious to see what other damage has been done. It's very likely that the valve timing was thrown out as the bearing got caught up in the cam chain so this may have caused valve and piston damage.

So a replacement engine is now on the way. This time round I'm not going to be stripping down the replacement engine, just doing the usual service items on that and then putting it in the bike. It's an engine which has done 8000 miles so much less mileage than what this had. It also looks to be in much better condition so looking forward to getting that in there.

I don't think this experience has put me off doing engine rebuilds (only if I needed to do one) but it has taught me a lot. Sometimes doing an engine rebuild is not always the most cost effective way of fixing an engine considering you can get pretty good used engines on eBay for near enough the same cost in replacement parts when doing a rebuild.

Secondly when it comes to engine rebuilds and replacing bearings. Do NOT and I mean absolutely DO NOT ignore what the service manual says about doing serious engine damage if you get the bearing selections wrong. They aren't kidding when they say that. Also don't mismatch crankcase halves as those things are machined as a set.

So looking back, I certainly would not have taken a sledge hammer to that oil cooler to get it off the engine block. The only reason I did that was because I had snapped off the rusted bolts trying to get the oil cooler off. That's another lesson learnt too - if you suspect a bolt is way too rusted to come off normally with a socket spanner, then use an impact wrench to get it off. The hammering action of the impact wrench is far less likely to snap it off compared to the twisting force of a socket spanner. Had I used the impact wrench in the first place, I would have been able to get the oil cooler off without problems.

I then wouldn't have cracked my lower crankcase and when I got the engine apart and replaced the crankshaft I should have ordered the correctly coloured bearings for the replacement crankshaft I put in there.

Another thing - plastigauge is not massively accurate. Whilst it gives an ok estimate of clearance it's not a pin point accurate measurement of clearance. I shouldn't have relied on this for my measurement of the clearances but also - considering my crankcase halves were mismatched anyway the crankshaft would have worn the bearings in the upper and lower crankcase halves at different rates causing the spun bearing that happened yesterday.

Finally - low oil pressure is pretty serious and a flickering oil light at idle was a good warning sign that things are going to get worse.